Arduino Projects
In this tutorial, we’re going to help you create a few simple arduino projects that are perfect for beginners. These basic projects will help you understand how to set up the Arduino software and then connect the components to perform a specific action.
If you’re completely brand new to Arduino, make sure you download our free ebook below. This guide was created for the absolute beginner and will help you to understand the Arduino board along with its parts and components.
FREE EBOOK (PDF) – Ultimate Beginners Guide To Arduino
Tools and Parts Needed
In order to complete the projects in this tutorial, you’ll need to make sure you have the following items.
- Arduino Uno Board
- Breadboard – half size
- Jumper Wires
- USB Cable
- LED (5mm)
- Push button switch
- 10k Ohm Resistor
- 220 Ohm Resistor
Need the parts? Get the Arduino Starter Kit w/ Project Ebook
Download The Software
At this point, we’re ready to download the free software known as the IDE. The Arduino IDE is the interface where you will write the sketches that tell the board what to do.
You can find the latest version of this software on the Arduino IDE download page.
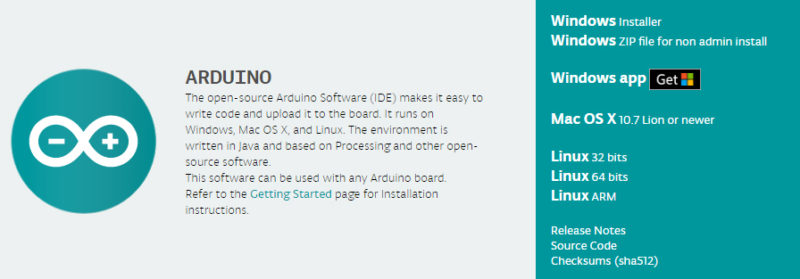
To install the software, you will need to click on the link that corresponds with your computer’s operating system.
Arduino IDE
Once the software has been installed on your computer, go ahead and open it up. This is the Arduino IDE and is the place where all the programming will happen.
Take some time to look around and get comfortable with it.
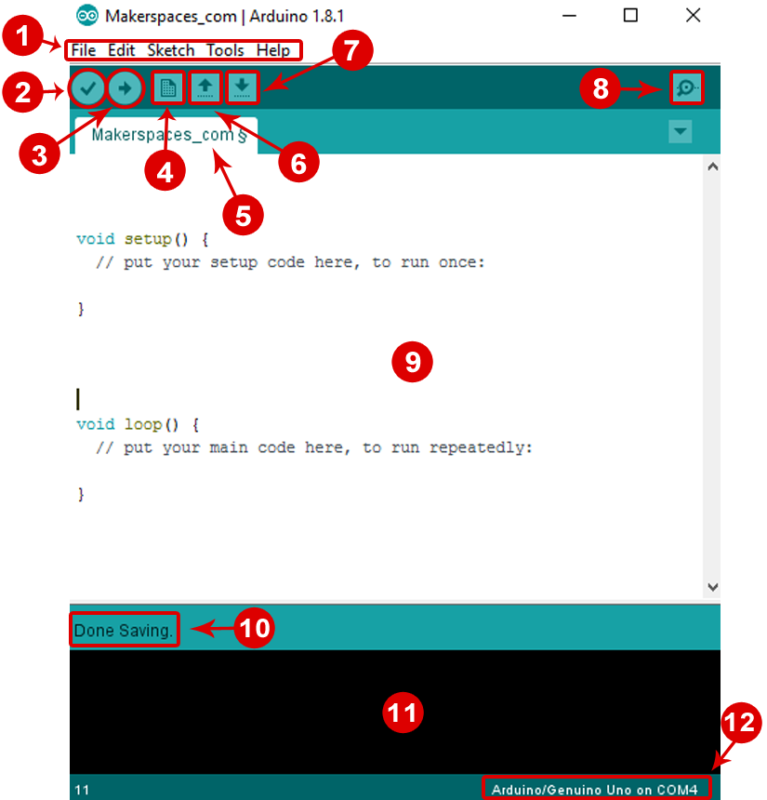
- Menu Bar: Gives you access to the tools needed for creating and saving Arduino sketches.
- Verify Button: Compiles your code and checks for errors in spelling or syntax.
- Upload Button: Sends the code to the board that’s connected such as Arduino Uno in this case. Lights on the board will blink rapidly when uploading.
- New Sketch: Opens up a new window containing a blank sketch.
- Sketch Name: When the sketch is saved, the name of the sketch is displayed here.
- Open Existing Sketch: Allows you to open a saved sketch or one from the stored examples.
- Save Sketch: This saves the sketch you currently have open.
- Serial Monitor: When the board is connected, this will display the serial information of your Arduino
- Code Area: This area is where you compose the code of the sketch that tells the board what to do.
- Message Area: This area tells you the status on saving, code compiling, errors and more.
- Text Console: Shows the details of an error messages, size of the program that was compiled and additional info.
- Board and Serial Port: Tells you what board is being used and what serial port it’s connected to.
Connect Your Arduino Uno
At this point you are ready to connect your Arduino to your computer. Plug one end of the USB cable to the Arduino Uno and then the other end of the USB to your computer’s USB port.
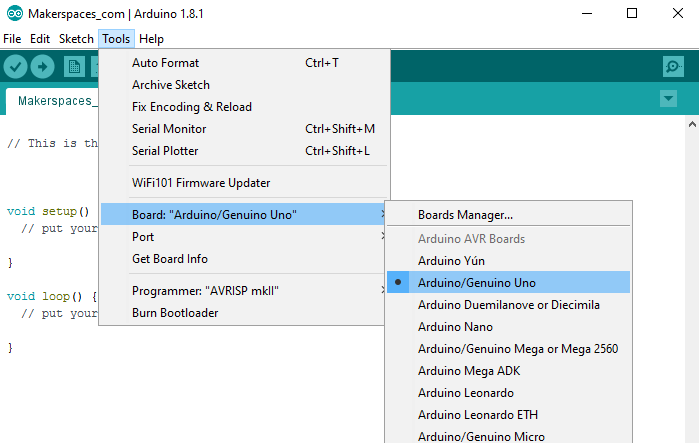
Once the board is connected, you will need to go to Tools then Board then finally select Arduino Uno.
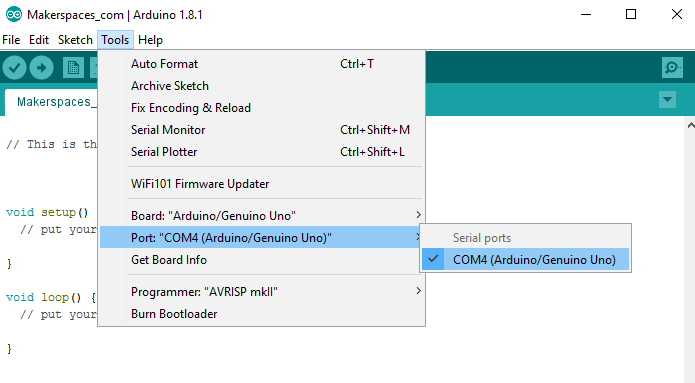
Next, you have to tell the Arduino which port you are using on your computer.
To select the port, go to Tools then Port then select the port that says Arduino.
Arduino Project 1: Blink an LED
It’s finally time to do your first Arduino project. In this example, we are going to make your Arduino board blink an LED.
If you need a refresher on the parts of the Arduino or how a breadboard works, check out our previous tutorial called Arduino For Beginners.
Required Parts
- Arduino Uno Board
- Breadboard – half size
- Jumper Wires
- USB Cable
- LED (5mm)
- 220 Ohm Resistor
Need the parts? Get the Arduino Starter Kit w/ Project Ebook
Connect The Parts
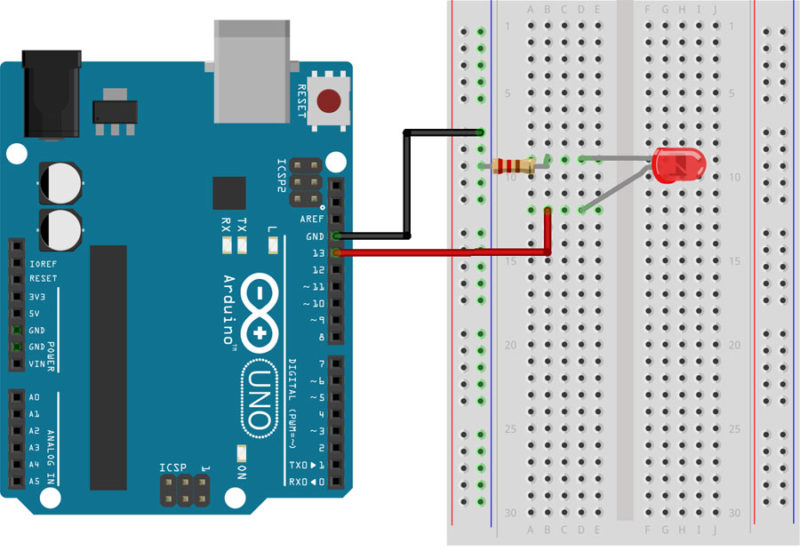
You can build your Arduino circuit by looking at the breadboard image above or by using the written description below. In the written description, we will use a letter/number combo that refers to the location of the component. If we mention H19 for example, that refers to column H, row 19 on the breadboard.
Step 1 – Insert black jumper wire into the GND (Ground) pin on the Arduino and then in the GND rail of the breadboard row 15
Step 2 – Insert red jumper wire into pin 13 on the Arduino and then the other end into F7 on the breadboard
Step 3 – Place the LONG leg of the LED into H7
Step 4 – Place the SHORT leg of the LED into H4
Step 5 – Bend both legs of a 220 Ohm resistor and place one leg in the GND rail around row 4 and other leg in I4
Step 6 – Connect the Arduino Uno to your computer via USB cable
Upload The Blink Sketch
Now it’s time to upload the sketch (program) to the Arduino and tell it what to do. In the IDE, there are built-in example sketches that you can use which make it easy for beginners.
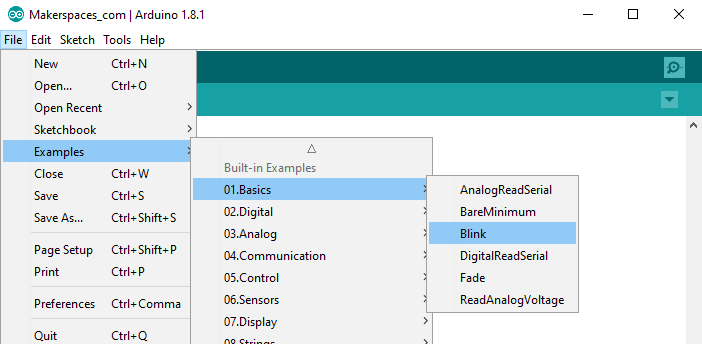
To open the blink sketch, you will need to go to File > Examples > Basics > Blink
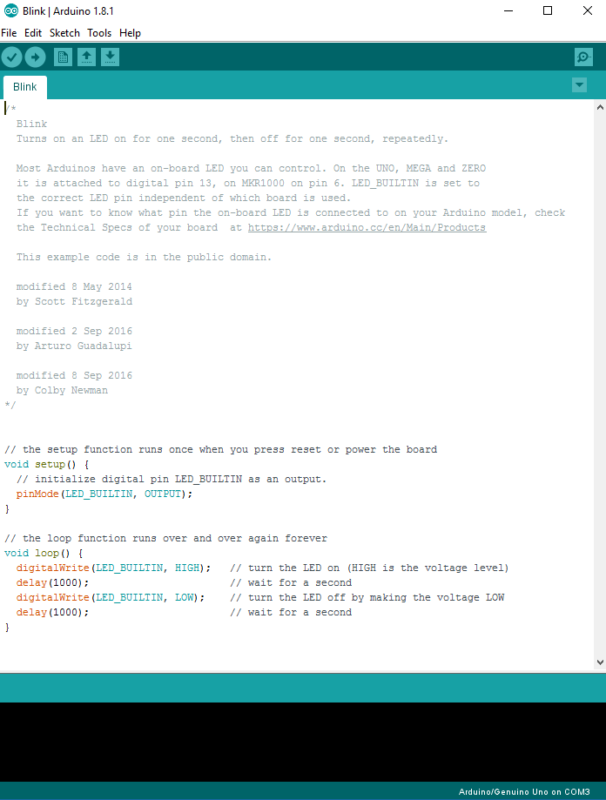
Now you should have a fully coded blink sketch that looks like the image below.
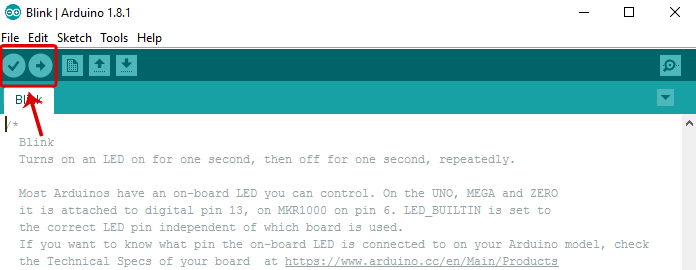
Next, you need to click on the verify button (check mark) that’s located in the top left of the IDE box. This will compile the sketch and look for errors. Once it says “Done Compiling” you are ready to upload it. Click the upload button (forward arrow) to send the program to the Arduino board.
The built-in LEDs on the Arduino board will flash rapidly for a few seconds and then the program will execute. If everything went correctly, the LED on the breadboard should turn on for a second and then off for a second and continue in a loop.
Congrats! You just completed your first Arduino project. Troubleshooting – If you ran into a problem don’t give up, check out the troubleshooting section below for common problems.
Change The Code
Before we go to the next project, lets change some of the code in the “Blink” sketch to make it do something different. Playing around with the sketch will help you start to learn how the code controls the board.
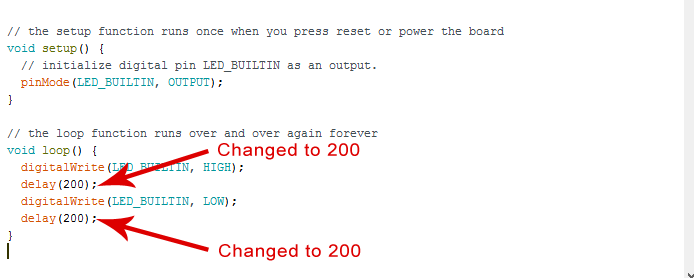
Keep the Arduino board connected and change the delay portion of the code from (1000) to (200). Click the verify button on the top left of the IDE and then click upload. This should make the LED on the breadboard blink faster.
NOTE – Arduino measures time in milliseconds and 1000 milliseconds = 1 second. The original code (1000) turns on the LED for 1 second and then off for 1 second. By adjusting the code from (1000) to (200) it shortens the time between on and off which makes it blink faster.
Arduino Project 2: LED w/ Switch
Now it’s time to talk switches and how they can be incorporated into Arduino projects. A switch is a electrical component that completes a circuit when pushed and breaks the circuit when released. In this project, we will be using a small pushbutton switch to control an LED.
Required Parts
- Arduino Uno Board
- Breadboard – half size
- Jumper Wires
- USB Cable
- LED (5mm)
- Push button switch
- 10k Ohm Resistor
- 220 Ohm Resistor
Need the parts? Get the Arduino Starter Kit w/ Project Ebook
Connect The Parts
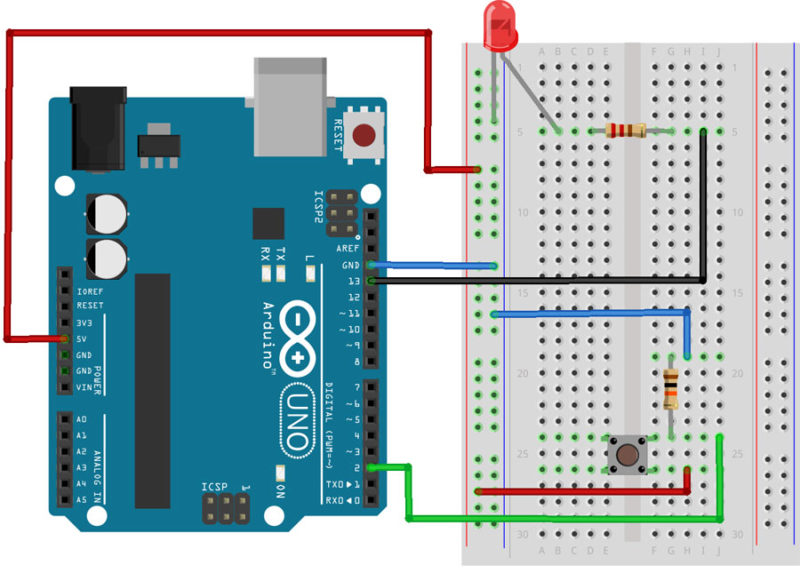
You can build your Arduino circuit by looking at the breadboard image above or by using the written description below. In the written description, we will use a letter/number combo that refers to the location of the component. If we mention H19 for example, that refers to column H, row 19 on the breadboard.
Step 1 – Connect the blue jumper wire from the GND on the Arduino to the GND rail (blue line) on the breadboard near A13
Step 2 – Connect the blue jumper wire from the GND rail on the breadboard near A17 to H19
Step 3 – Connect the red jumper wire from the power rail on the breadboard around row A27 to H26
Step 4 – Connect the green jumper wire from pin 2 on Arduino to J24 on the breadboard
Step 5 – Place one leg of a 10k Ohm resistor in G19 and the other leg in G24
Step 6 – Place the pushbutton switch into F24, F26, E24 and E26
Step 7 – Place one leg of a 220 Ohm resistor in D5 and the other leg in G5
Step 8 – Insert the short leg of the LED in the GND rail around A5 and the long leg in B5
Step 9 – Connect the black jumper wire from pin 13 on the Arduino to I5 on the breadboard
Step 10 – Connect the red jumper wire from 5V on the Arduino to power rail (+) near A8
Step 11 – Connect the Arduino Uno to your computer via USB cable
Upload The Switch Sketch
Now it’s time to upload the sketch to the Arduino that will allow us to use a switch. As with the blink sketch, there are example programs already loaded in the Arduino IDE that we will be using.
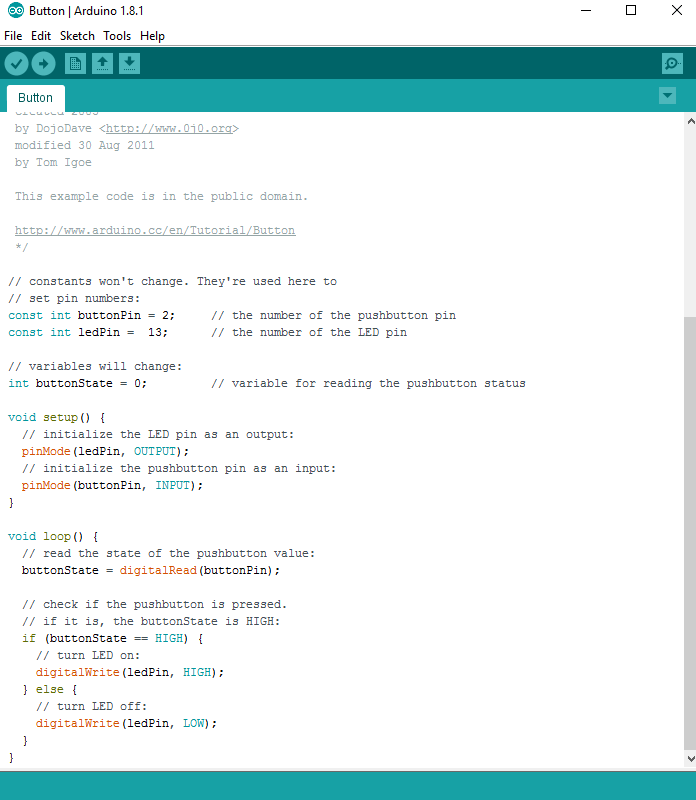
In order to use a switch, we have to load the file called “Button” which can be found here: File > Examples > Digital > Button
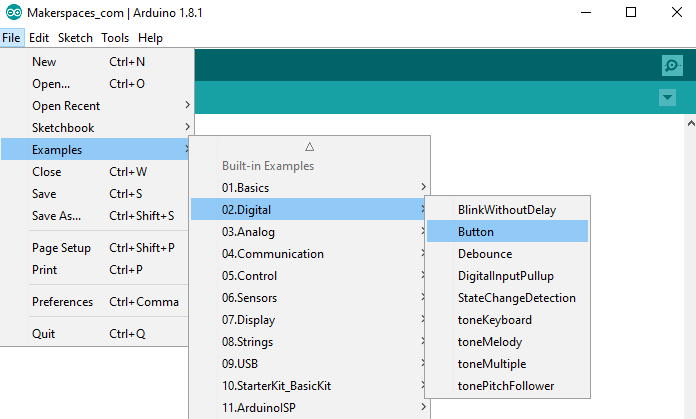
Now you should have a fully coded button sketch that looks like the image below.
Next, you need to click on the verify button (check mark) that’s located in the top left of the IDE box. Once it says “Done Compiling” you are ready to upload it. Click the upload button (forward arrow) to send the program to the Arduino board.
Press the button switch on the breadboard and you should be able to turn on and off the LED as shown in the below video.
Ready for more projects? Check out our next post – 15 Arduino Uno Breadboard Projects
Troubleshooting
If you are having any problems with the projects we did, make sure the following has been checked.
- Verify the LED is actually functional. Use a 3v coin cell battery and connect the LONG leg of the LED to the (+) and SHORT leg to the (-) of the battery.
- Verify the correct leg of the LED is connected properly. LONG leg to positive and SHORT leg to negative.
- Make sure the Arduino IDE shows the correct board. Go to Tools > Board then select Arduino Uno.
- Make sure the Arduino IDE shows the correct port. Go to Tools > Port then select the port that says Arduino.
- Verify all component connections are secure with the Arduino board and breadboard.
Resources
- This instructable and LED calculator will help you determine which size resistor to use for projects involving LEDs
- This resistor color code calculator will help you decode what size resistor you have based on the color bands