
FREE PDF Download – (5) Paper Circuit Project Templates
What are Paper Circuits?
A paper circuit is a low-voltage electronic circuit that is created on paper or cardboard using conductive copper tape, LEDs and a power source such as a coin-cell battery. Creating paper circuits is a good way to teach the basics of electricity and how circuits function. In addition to being educational, they can also be a fun makerspace project that helps to bring artwork and paper craft to life. By adding sensors, buzzers and motors to your circuit, you can also add another dimension of interactivity. These simple projects are great for all ages and all makerspaces.
A paper circuit smiley for Halloween! Got inspired from the new book by @Makerspaces_com #papercircuits pic.twitter.com/366y0PxCGN
— cincoutprabu (@cincoutprabu) October 10, 2016
Paper Circuit Examples
There are a lot of creative and imaginative ways to create a paper circuit. These examples from Jie Qi at Chibitronics are truly amazing. Take a look at her Flickr page too see even more paper circuit creations.

Creating paper circuits is a natural fit for the classroom or library. Here’s a good example:
Making paper circuits to “illuminate” a concept in our course or classroom. We are #makers !!#MAETy1 pic.twitter.com/GiSF50RgCJ
— Katie Dahmer (@k_dahmer) June 23, 2016
More Friday morning fun with paper circuits! #tinkeringmooc Planning this for Maker Club @ROMS_Learning pic.twitter.com/pOEsnn76hZ
— Jill Gardy Hill (@jmgardyhill) August 5, 2016
This video shows how Milan Dahal used paper circuits to create animation.
Paper cricket #paperCircuits pic.twitter.com/4zhsZCJNs3
— सुरेश (@SuRayShG) September 11, 2016
Paper Circuit Tutorial
FREE PDF Download – (5) Paper Circuit Project Templates
Materials Needed:
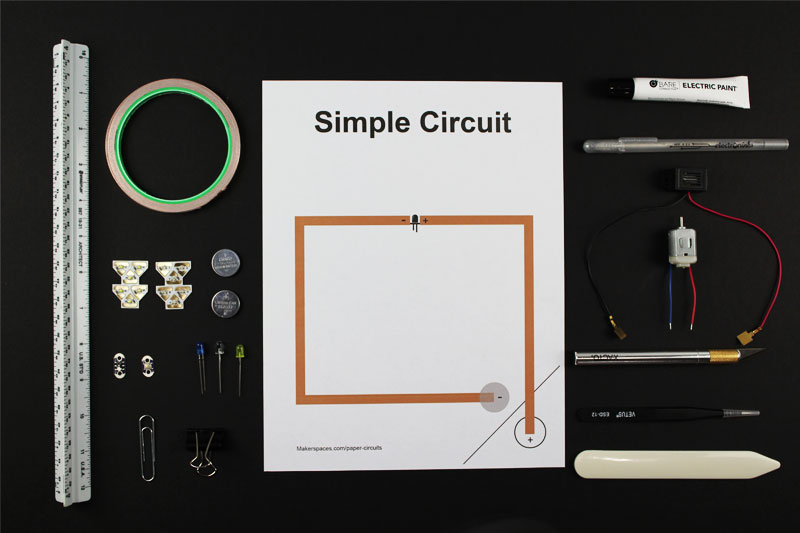
There are a wide variety of paper circuit projects you can do. Shown below are most of the materials that you will need in order to complete these different projects. Later in this post, you will learn how to create a simple circuit and will only need copper tape, an LED and a coin cell battery.
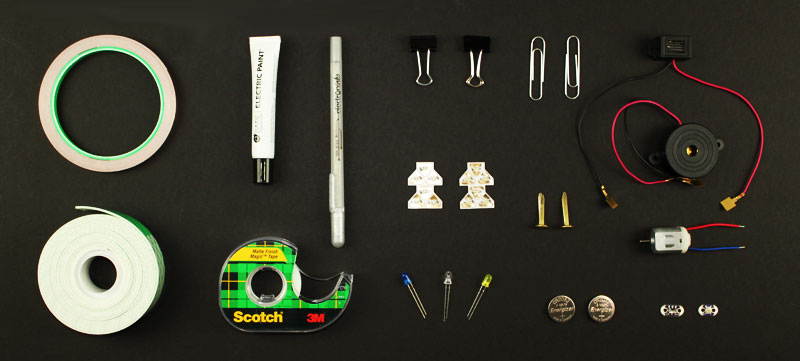
- Coin-cell battery (3V) CR2032
- Copper tape (1/4″) with conductive adhesive
- LED – 5mm, 10mm, surface mount or similiar
- DC Hobby motor – 130 size
- Buzzer – mechanical or piezo
- LilyPad button board or slide switch
- Paper clip or Binder clip
- Clear tape
- Double-sided foam tape
- Card stock paper – 65-110 lb
- Printer/copy paper
- Brass brads
- Circuit Stickers from Chibitronics (optional)
- Circuit Scribe – conductive ink pen (optional)
- Electric Paint from Bare Conductive (optional)
Tools Needed:

- Scissors
- X-Acto hobby knife
- Paper scoring tool
- Cutting mat
- Ruler
- Tweezers
- Wire snippers
Optional Tools:
The great thing about paper circuits is the ability to create a circuit without the need for soldering. Having said that, you can use a soldering iron for specific reasons which will be explained later. Another optional tool is a paper trimmer which is great for when you are creating paper crafts that light up. Using a paper trimmer is also a safer option then scissors if you are doing this project with younger kids.
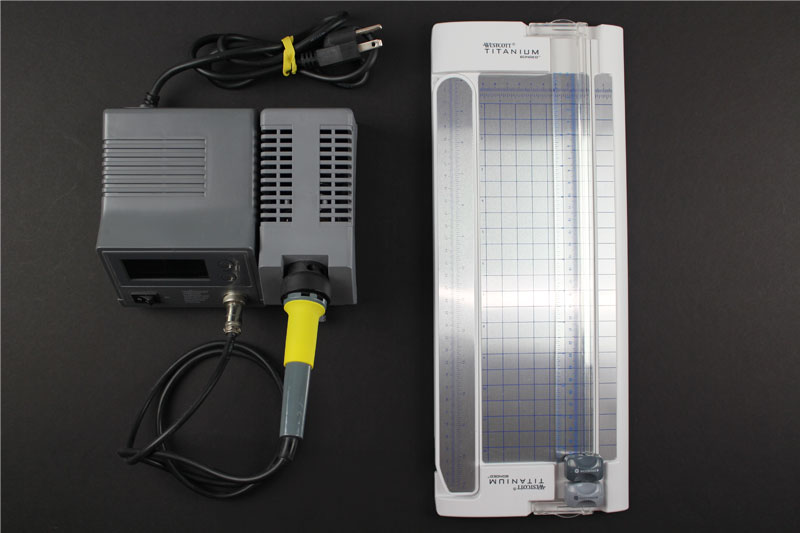
- Paper trimmer
- Soldering iron
Places to Buy Paper Circuit Materials:
- Adafruit
- Chibitronics (Circuit Stickers)
- Maker Shed
- Amazon
- Sparkfun
- Digi-Key
- Harbor Freight
- Radio Shack
- Mouser Electronics
- MCM Electronics
- Michaels Crafts
- Electroninks (Circuit Scribe)
- Bare Conductive (Electric Paint)
Step-by-Step Paper Circuit Tutorial
WARNINGS – Copper tape can have very sharp edges and is able to cut skin like a paper cut so be careful. Also, this project is low voltage 3v DC and is NOT intended to be used with your wall outlet or 120v. There are small items used in this project such as LEDs and can be a choking hazard for children under 3 years. Most importantly, have fun !
Introduction
Creating a paper circuit is a very fun and easy way to learn about circuits while being creative at the same time. In this tutorial, we are going to make a “simple circuit” which is the most basic of all circuits. To begin with, check out this introductory video from Chibitronics that gives a quick overview about working with copper tape.
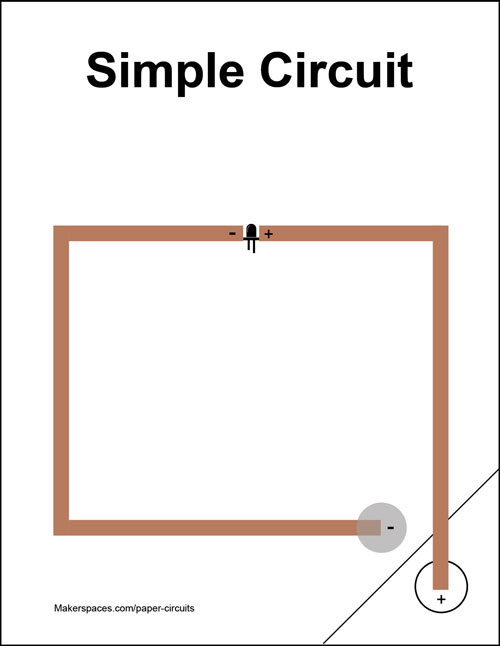
Step 1 – Print Out The Template
Before we start you will need to download our Simple Circuit template and print it out on standard printer paper. Card stock is not needed for this particular paper circuit project.
You can also right-click the image below and choose “Save Link As” to save the printable template to your computer.
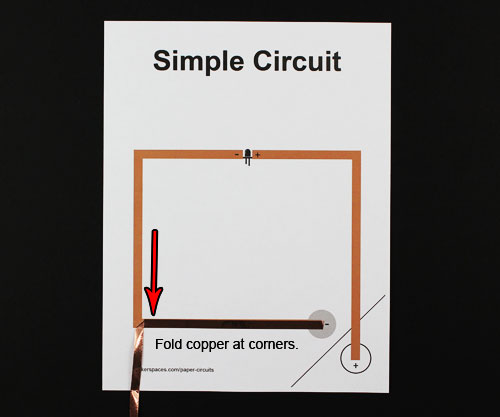
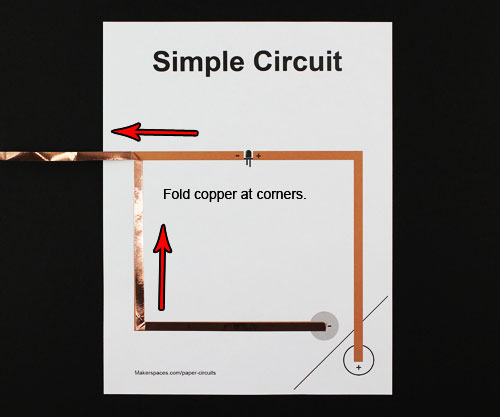
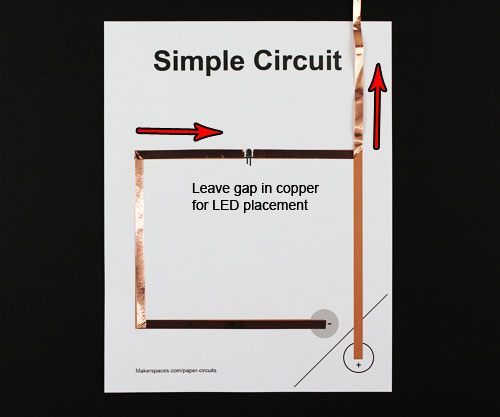
Step 2 – Apply Copper Tape to Trace Lines
Apply copper tape to all trace lines as marked in brown on the template. Smooth the copper down with your finger. Try to maintain a continuous strip of copper tape versus cutting it at the corners. Fold copper tape at the corners by bending it at a 45′ angle in the opposite direction of where you are going. Then fold it back at a 180′ angle and continue applying to the trace line.
Make sure to leave a gap in the copper tape so the LED can be mounted properly.
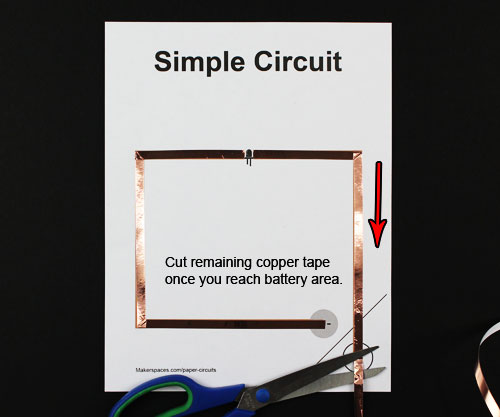
Cut the remaining copper tape once you reach the designated battery area.
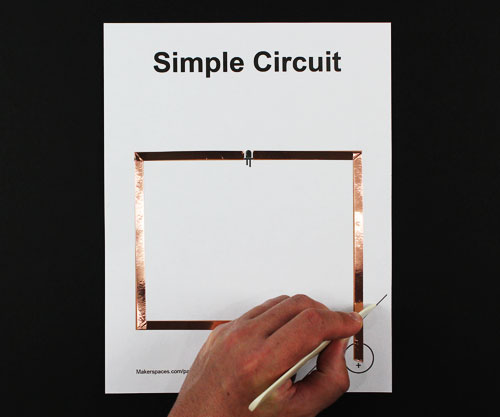
Step 3 – Score and Fold
Score and then fold the corner line. A scoring tool is very helpful when making folds during a paper circuit project.
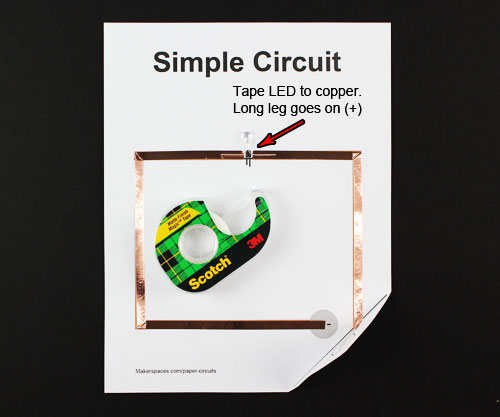
Step 4 – Mount LED to Copper Trace
Mount the LED to the copper trace using clear tape. To do this, bend both legs of the LED at a 90′ angle and then tape legs securely to the copper. Make sure that the long leg of the LED goes to the positive (+) side of the copper trace.
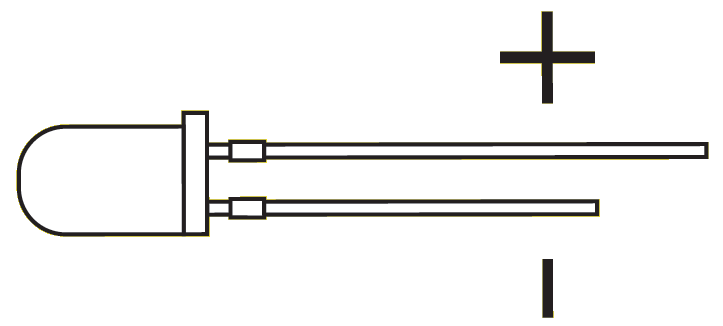
The image below from Sparkfun shows how to tell which leg of an LED is positive. If the legs have been cut, you can also determine which side is negative by looking for the flat side of the LED casing.
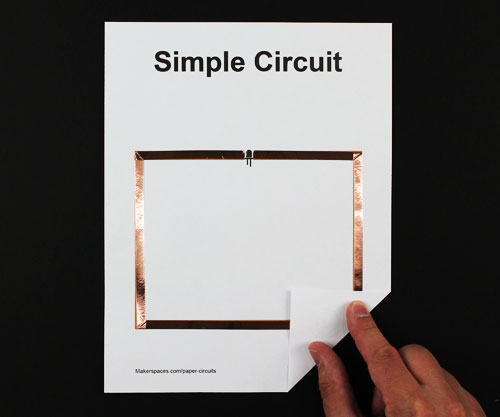
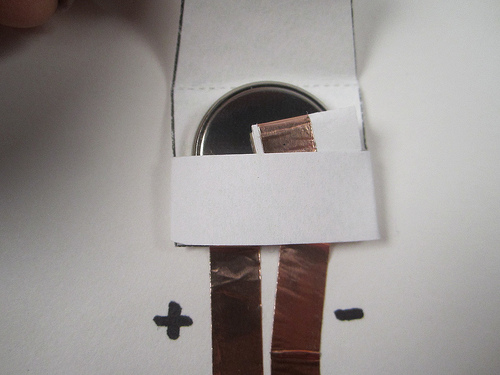
Step 5 – Attach Battery To Circuit
Last step is to place the coin-cell battery on the copper trace. In this example, make sure the battery (-) is facing down on the copper. The corner flap which is (+) should then be able to contact the battery (+) when folded.
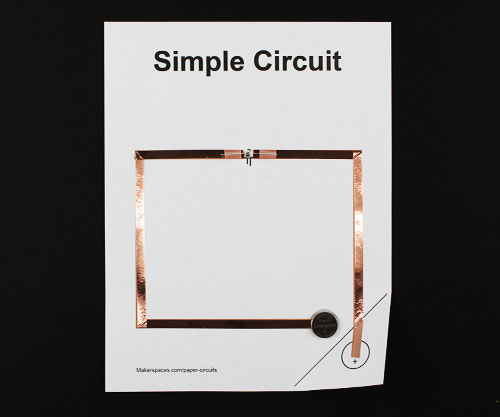
At this point you can secure the corner using a paper clip or binder clip.

FREE PDF Download – (5) Paper Circuit Project Templates
Optional – you can create a paper battery holder which securely holds your coin-cell battery. Chibitronics has a wonderful step-by-step tutorial on how to create one of these.
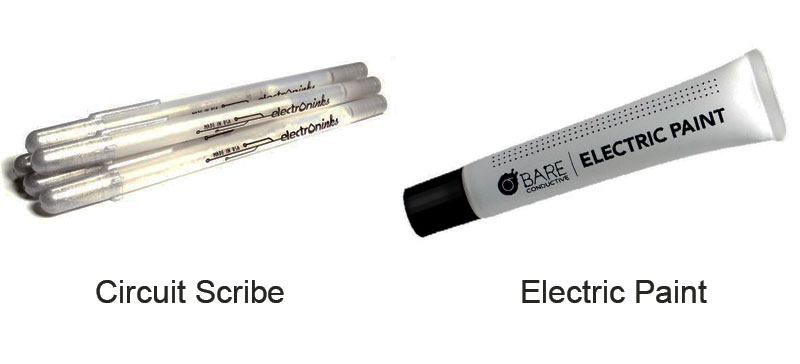
Conductive Ink or Electric Paint
To create a paper circuit you don’t always need to use copper tape. Another good option is to use conductive ink (Circuit Scribe) or electric paint (Bare Conductive) to help form the circuit. There are pros and cons however to using these products over copper tape. For example, if you choose to use electric paint you will need to wait a few minutes for the product to dry. According to the manufacturer, “the conductivity of Electric Paint increases as it dries, therefore it is important to wait until it is completely dry to test your projects”. But the good thing about using paint and ink is that you are able to make very unique shapes and patterns that you wouldn’t have been able to with copper tape.
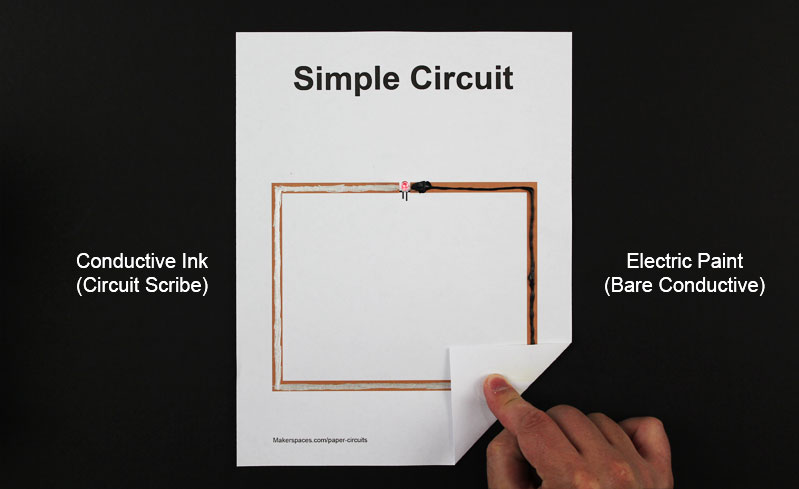
Below is a great example of a paper circuit project involving conductive ink or electric paint. Make a greeting card that lights up !
#Makerspace project – make an electric greeting card w/ conductive paint via @instructables https://t.co/dtg4fQZxxk pic.twitter.com/4bpeHqqhn1
— Makerspaces.com (@Makerspaces_com) April 23, 2016
Chibitronics Circuit Stickers
A great alternative to the standard LED are Circuit Stickers by Chibitronics. A circuit sticker is a peel-and-stick LED for creating circuits and craft projects. They can be stuck to almost any surface such as paper, plastic, fabric etc. They work with copper tape, conductive ink or even electric paint. Chibitronics also has a line of sensor and effects stickers in addition to the LED sticker. These add-ons can make your project blink, pulse or be responsive to sound.
When using these, make sure to stick the narrow side of the sticker to the negative side of the copper trace. The larger side of the circuit sticker is positive. One great advantage of circuit stickers is their low power consumption. You can light up more circuit stickers per (1) 3v battery than you could using standard LEDs.

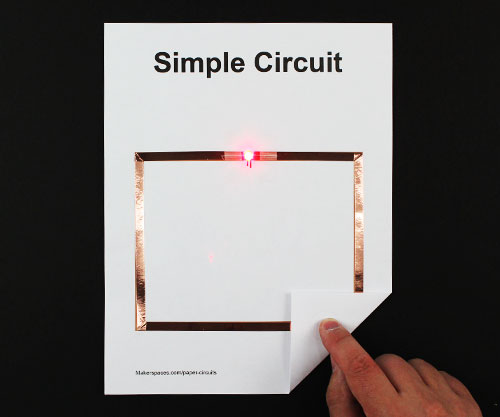
Troubleshooting
Is your LED not lighting? Most of the time it’s a very simple fix. Here is a list of the common ways to make your paper circuit functional.
- Make sure that the LONG leg of your LED is secured to the positive (+) side of the circuit because this is easy to mix up.
- Sometimes the LED legs are just not contacting the copper tape well enough. Rub the clear tape that secures the LED to ensure there is a solid connection with the copper tape below.
- Inspect the battery. Make sure the negative (-) of the battery is touching the negative side of the copper tape and the same goes with the positive. Furthermore make sure there is a solid connection between the battery and copper. Sometimes you need to tape the battery down using clear tape.
- It’s highly recommended that you try to maintain a continuous strip of copper foil versus cutting it. But sometimes you just need to make a cut. Make sure you push down and rub the two pieces of copper that are taped together. There needs to be a solid connection.
- Ensure all copper tape has been smoothed down on the paper with as few wrinkles as possible.
- Is there a short in the circuit? A short can happen when the positive and negative copper tape make contact with each other. Check around the battery area and the LED area which are common places for this to happen.
- If you’re using a LilyPad switch make sure it is taped down firmly to the copper tape below it. Also, there needs to be a gap in the copper directly below the switch as outlined on the template.
- Finally, are your parts even functional? At times you might just have a bad battery or bad LED. One easy way to test both of these items is to place the LED directly onto the battery. Make sure the LONG leg is touching the positive side of the battery.
LEDs are used in a ton of #makerspace projects. Here’s a simple way to test one. Remember long leg is positive. https://t.co/41ZOiIW9Gb
— Makerspaces.com (@Makerspaces_com) September 15, 2016
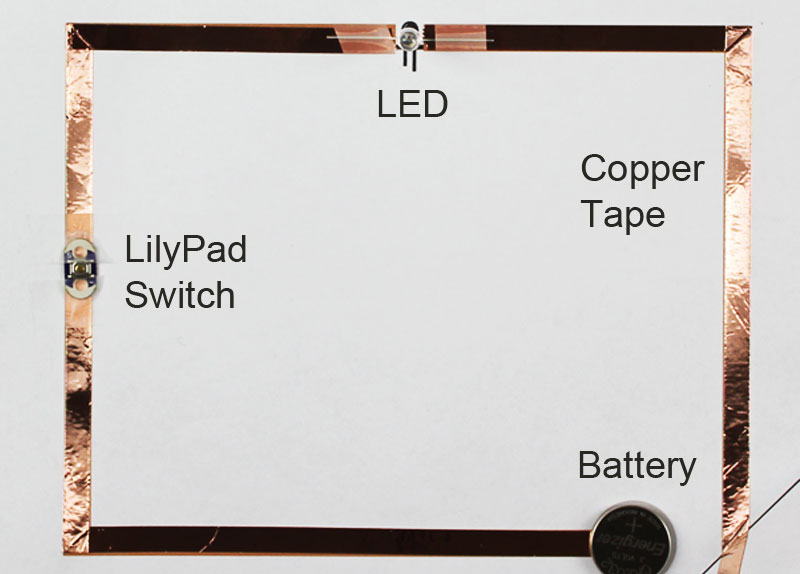
Paper Circuit with Switch
Now that you’ve seen how to create the basic circuit, we’re going to step it up a notch and add a switch to control the LED.
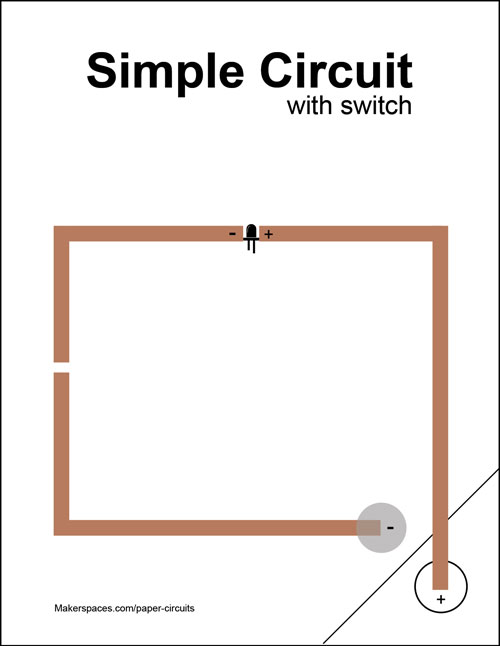
Step 1 – Print Circuit Template
Download our Simple Circuit w/ Switch template and print it out on standard printer paper. Card stock is not needed for this particular paper circuit project.
You can also right-click the image below and choose “Save Link As” to save the printable template to your computer.
Step 2 – Apply Copper Tape to Trace Lines
Apply the copper tape to all brown trace lines on the template. Try to maintain a continuous strip of copper tape versus cutting it at the corners. Fold copper tape at the corners by bending it at a 45′ angle in the opposite direction of where you are going. Then fold it back at a 180′ angle and continue applying to the trace line. Make sure to leave a gap in the copper tape so the LED can be mounted properly. Cut the remaining copper tape once you reach the designated battery area.
Step 3 – Score and Fold
Score and then fold the corner line. A scoring tool is very helpful when making folds during a paper circuit project.
Step 4 – Mount LED to Copper Trace
Mount the LED to the copper trace using clear tape. To do this, bend both legs of the LED at a 90′ angle and then tape legs securely to the copper. Make sure that long leg of the LED goes to the positive (+) side of the copper trace.
Step 5 – Attach Battery To Circuit
The next step is to place the coin-cell battery on the copper trace. In this example, make sure the battery (-) is facing down on the copper. The corner flap which is (+) should then be able to contact the battery (+) when folded. Finally, add a paperclip or binder clip to secure the corner.
Step 6 – Attach LilyPad Switch To Circuit
Finally, the LilyPad switch needs to be taped on top of the copper tape. Make sure there is a gap in the copper below the switch as outlined on the template. We love the LilyPad switch because of it’s small form factor but there are other ways to create a switch. We outline this alternative method below.

These LilyPad button and slide switches are available at Sparkfun.
If you don’t have a LilyPad switch you can always create a switch with a flap of paper with copper on it. Tape the paper switch over the gap with the copper facing down. Press down on the switch to close the circuit and turn on the LED.
Want More Paper Circuit Templates?
We’ve put together a collection of 5 beautifully designed paper circuit templates that have step-by-step instructions on them. We hope you like these projects and we would love to see what you design. Follow us on Twitter @Makerspaces_com and show us your paper circuits. Have fun and keep learning !
FREE PDF Download – (5) Paper Circuit Project Templates
Paper Circuit Resources
The internet is filled with great information on paper circuits and here are some of our favorite resources.

Paper Circuits – The Tinkering Studio
Paper Circuits with Copper Tape – High-Low Tech
The Great Big Guide to Paper Circuits – Sparkfun
Paper Circuit Tutorials – Chibitronics
Getting Started with Circuit Stickers – Jie Qi
Plan and Build Your Circuit – Adafruit
Electricity and Circuit Education
Adafruit has a really great learning section on their site which covers almost every maker topic out there. If you want to dig deeper into circuits and electricity, check out their video series called Circuit Playground.